When undertaking a home renovation project, deciding to paint directly over existing wallpaper can seem like an exceptionally attractive shortcut. Stripping old wallpaper, scraping away stubborn adhesive residues, and painstakingly preparing bare walls before applying a fresh coat of paint is notoriously time-consuming and labor-intensive. By opting to paint straight over the paper, homeowners hope to bypass the messiest stages of redecorating, saving both hours of manual labor and significant frustration. However, interior design and home improvement professionals emphasize that while this method is entirely viable under the right circumstances, it requires careful evaluation, meticulous preparation, and an understanding of several potential pitfalls that can ruin the final finish if ignored.
Before committing to a paint-over-wallpaper project, property owners must first conduct a thorough inspection of the current wall coverings. The primary prerequisite for success is that the underlying paper must be in sound structural condition, completely free from rips, tears, or deep scratches. If the wallpaper is already compromised, brittle, or severely damaged, attempting to paint over it is generally ill-advised. In such scenarios, professional decorators strongly recommend taking the extra time to completely strip the material and paint the bare plaster underneath. Painting over compromised surfaces almost always results in an uneven texture, further tearing, or the eventual failure of the newly applied paint layers.
Another critical factor to evaluate is the adhesion of the wallpaper to the wall surface. If the paper is peeling away in multiple places, even if the surface itself is not ripped, it is a clear indicator that the original wallpaper paste is failing. This loss of adhesiveness can stem from several underlying issues, such as the use of substandard paste during the initial installation or chronic dampness within the room that has slowly broken down the adhesive bonds. Painting over lifting wallpaper will only trap moisture or weight the paper down further, accelerating its detachment from the wall.

However, if the peeling is strictly localized to a single, isolated area, the situation is usually salvageable. Homeowners can carefully re-secure the loose section using dedicated wallpaper paste, smoothing it down gently to prevent the formation of unsightly air bubbles. Crucially, the repaired spot must be allowed to dry completely before any primers or topcoats are introduced to the area.
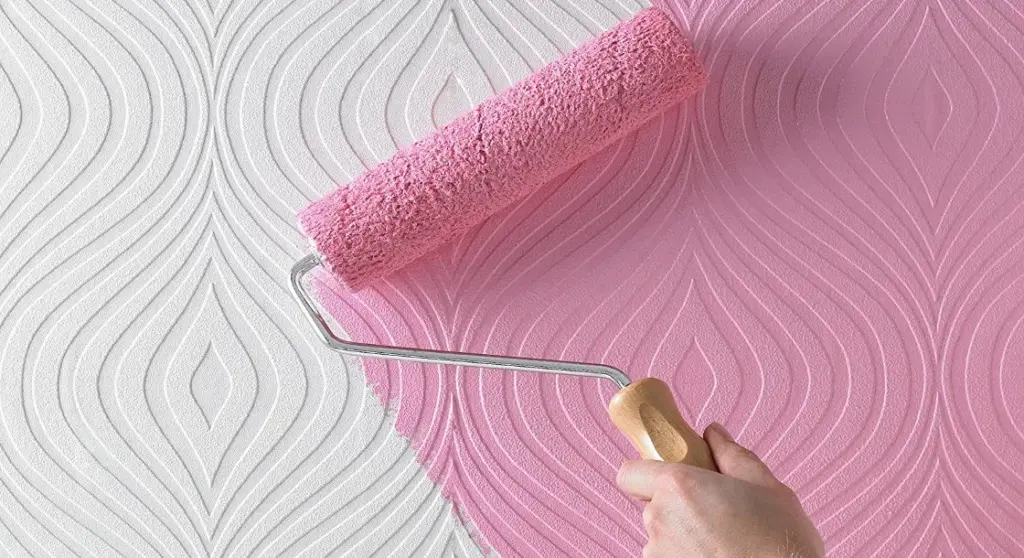
Regarding the style and texture of the wall covering, plain and flat wallpaper provides the most straightforward canvas for a paint makeover. Textured and patterned papers can still be painted over successfully, but homeowners must be willing to accept that the underlying texture, embossing, or patterns will remain visible beneath the new color, adding a distinct dimensional quality to the finished wall.
Assuming the initial inspection confirms that the wallpaper is firmly attached and in good condition, the project moves into the preparation phase. While skipping the stripping process saves considerable time, adequate surface preparation remains non-negotiable for achieving a professional-grade finish. The surrounding area must be properly protected using decorator’s masking tape and drop cloths to prevent accidental splatters on trim, baseboards, and flooring.
Even when dealing with light-colored or unpatterned wallpaper, applying at least one coat of primer is strongly recommended by painting professionals. Primer serves as a vital stabilizing layer that helps achieve a clean, uniform finish when the final topcoat is applied, while also making the underlying paper easier to conceal completely.

A critical technical consideration during this stage involves the choice of primer. Water-based primers should generally be avoided because they run the risk of soaking too deeply into the wallpaper. This excessive moisture can reactivate the old adhesive beneath, compromising the bond and causing the wallpaper to bubble or peel away from the wall. To circumvent this risk, experts recommend using an oil-based primer or specialized multi-surface sealers, such as dedicated all-in-one primer and sealer formulations designed to safely lock down wallpaper surfaces. Applying one or two thorough coats of an appropriate primer, followed by adequate drying time, ensures a stable foundation for the subsequent topcoat.
Once the priming stage is complete and fully dry, homeowners can select their desired topcoat paint color and begin transforming the room. While proper planning and meticulous preparation generally allow for a smooth process, certain complications can still arise as the work progresses. Fortunately, most of these issues can be successfully resolved with a little extra patience and corrective work.
One common issue involves the appearance of thin gaps between individual strips of wallpaper. While wallpaper applied with precise craftsmanship will not show seams, the natural drying process that occurs after pasting can sometimes cause the paper to shrink slightly over time, leaving narrow gaps where the bare wall or old backing is exposed. While this is not an insurmountable disaster for a painting project, it must be addressed before the room is finished.
Assuming the rest of the wallpaper remains completely sound and securely affixed, decorators can utilize standard wall filler to meticulously conceal the gaps between the sheets. This corrective step is best performed after the primer coats have been applied. Once the filler has set entirely, it must be carefully sanded back until it is perfectly flush with the level of the surrounding paper. Because any raised filler will stand out starkly and create an unsightly blemish once the final topcoat of paint is rolled over it, taking the time to achieve a smooth, seamless surface is essential for a polished result.